In this entry we will work in creating a basic environment that will help us to run performance and load testing using a traffic generator called SIPp.
First, let’s start defining our components and IP addresses to use in this lab environment:
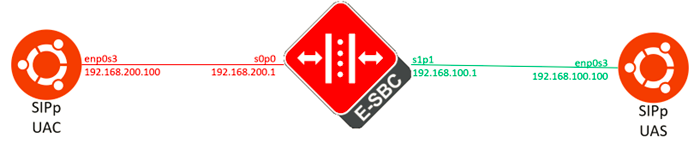
As you can see in the image above, we will use 2 Ubuntu OS running in Virtualbox in its more basic installation (please refer to the post Oracle SBC – Lab Setup – Ubuntu OS VM install in case any doubt).
In this specific case we will use the Oracle SBC as the routing element (please refer to posts in Oracle SBC – Lab Setup series as the same configuration will be used in the current post).
Make sure you install the following software in the Ubuntu OS VMs (currently using Ubuntu 22.04 LTS, you can copy and paste the following commands in console to install the software):
apt install -y pkg-config
apt install -y dh-autoreconf
apt install -y ncurses-dev
apt install -y build-essential
apt install -y libssl-dev
apt install -y libcap-dev
apt install -y libncurses5-dev
apt install -y libsctp-dev
apt install -y lksctp-tools
apt install -y libpcap-dev
apt install -y cmake
apt install -y git
The next step is download SIPp software from github, you can download the latest software version with the following command using the console:
git clone https://github.com/SIPp/sipp.gitNow its time to install the software, use the following commands:
cd sipp
cmake . -DUSE_SSL=1 -DUSE_SCTP=1 -DUSE_PCAP=1 -DUSE_GSL=1
make all
cmake .

cp sipp /usr/local/bin

sudo make install
cd /home/jgrojas81/
sipp -v
Take note of the SIPp path software installation, in my case these are the 2 important folders:
SIPp scripts are located in -> /home/jgrojas81/sipp/docs/
SIPp captures can be located in -> /home/jgrojas81/sipp/pcap
SIPp comes with integrated scenario to have different behaviors on the User Agents. In this entry we will use the default User Agent Server and User Agent Client with media (this scenarios are located in sipp/docs) like the image below (for more information about the scenarios please visit https://sipp.readthedocs.io/en/latest/index.html):
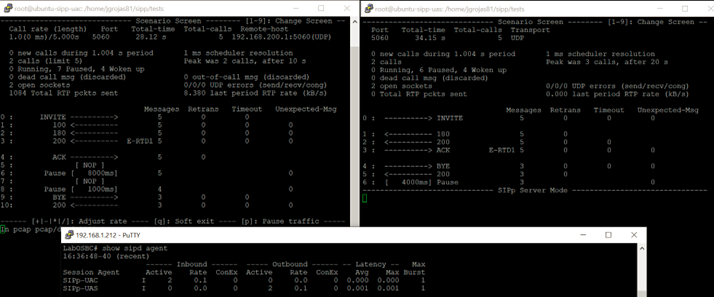
Its time to bring service up, starting with the UAS (User Agent Server – the one that is receiving the traffic) must be started first with the following command (running Server on port 5063 for a port conflict, make sure you adjust the configuration in the session agent in the Oracle SBC):
sipp -p 5063 -sn uas -i 192.168.100.100
-p			Use port 5063
-sn			Uses a default scenario for User Agent Server
-i			Use interface 192.168.100.100
Now in the UAC (User Agent Client – the one that generates the traffic) execute:
sipp -sf uac_pcap -r 1 -rp 5000 -i 192.168.200.100 192.168.200.1 -trace_err
-sf			Loads an alternate XML scenario
-r			rate per second set to 1 (1 call per second)
-rp			send calls every 5000 ms
-i			interface 192.168.200.100
192.168.200.1 		is the IP address to send the calls to
This are screenshots running the commands in real time (left is the UAC, right is the UAS, bottom is Oracle SBC CLI), call rate can be adjusted pressing +, -, *, / which increases in 1, decreases in 1, increases by 10, decreases by 10 respectively.
Testing can be finished pressing q, which displays the results.
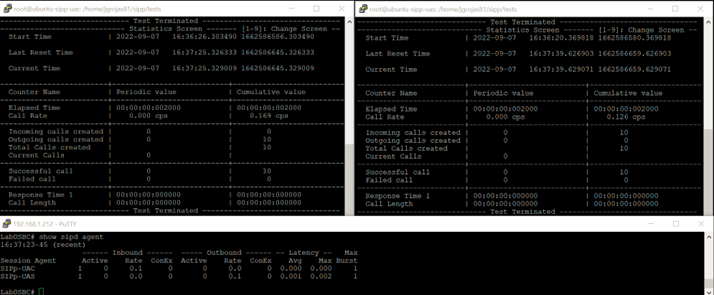
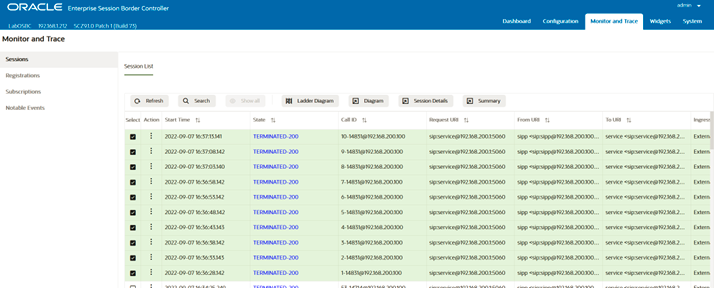
Here is a display of the Monitor and Trace in the SBC:
Useful links
https://computingforgeeks.com/how-to-install-sipp-testing-tool-on-ubuntu/
https://sipp.readthedocs.io/en/latest/
this concludes the entry, we will use the SIPp application in the future.